Tuesday, July 26, 2011

SQL Server DENALI CTP3 Installation

Here is a post to demonstrate the installation process of the latest release of SQL Server, DENALI CTP3 (not CTP1).


Steps:


1. Run the SETUP executable to start the installation wizard.


2. Installation Center appears with lot of options. We are looking for installation, so click it.


3. Specify the Installation type; a fresh installation or a add features to existing installation.


4. A fresh installation looking forward to install all the components of CTP3.


5. Select All Components.


6. Installation Rules passed, so route clear for the next steps.


7. Wanna make it a Default instance or a Named instance?
I named the instance as DENALICTP3. I already have the CTP1 with instance name DENALI.


8. Checks the Disk Space requirements. Everything is good here....


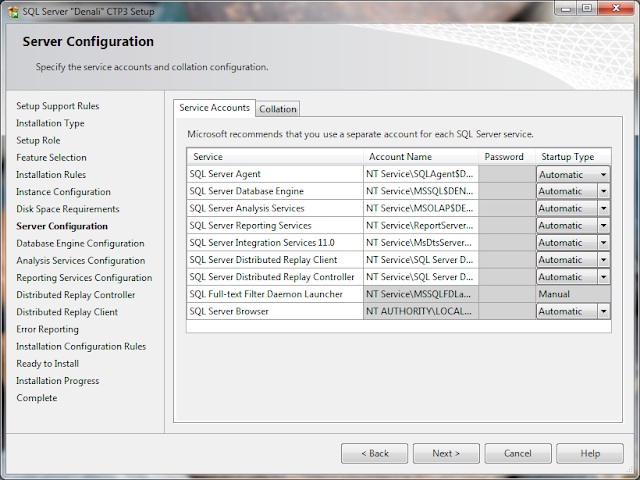
9. Configuring the Service Accounts and Service Startup Types. I went with the default collation here.


10. I have not set the Mixed mode authentication here, just went with the default windows authentication.
However, we can enable Mixed mode anytime after the instance is setup.


11. One can change the location of the directories from default C:\Program Files\Microsoft SQL Server\ to any other drive.....


12. Analysis Services Configuration page set to Multidimensional and Data Mining Mode.


13. Reporting Services Install and Configure with Native Mode.


14. Sam has given the permissions for the Distributed Replay Controller service.


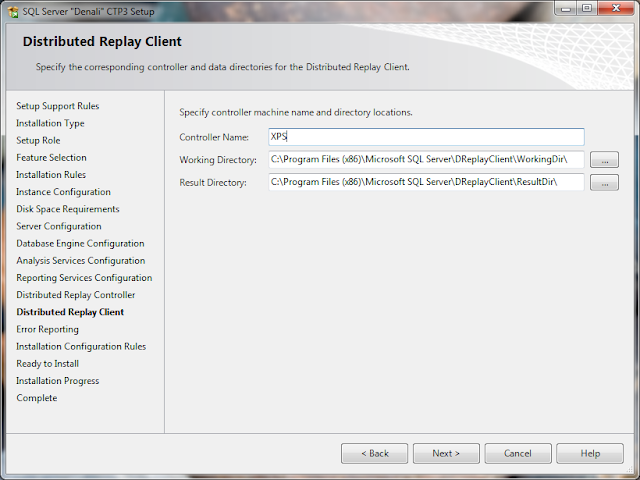
15. Specify a controller machine name and folder locations for Distributed Replay Client.


16. Reports errors automatically to Microsoft, if faces any.


17.Verifies the configuration rules.


18. Ready to start.....


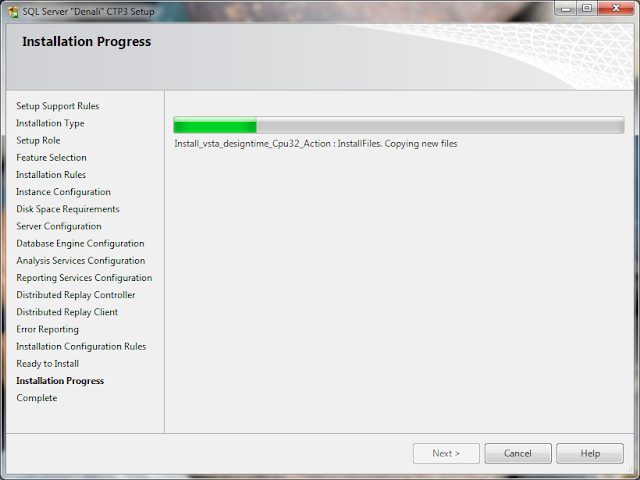
19. Installation in progress......


20. Success!!! The installation of SQL Server "DENALI" CTP3 is a succeeded.


21. Restart the machine to complete the installation process totally.


22. Check the services of various SQL Server Components including DB Engine, IS, AS, RS, Agent, DR Controller and Client etc.,


And whats the next step, simply start exploring.....good luck........!!  :)

Saturday, June 18, 2011

How to create SSIS package in DENALI???

This may sound funny to all the experts working on SQL Server Integration Services from 2005 till 2008 R2, but the Visual Studio enhancements for the Integration Services Project made me to write this post. You will find few screen shots of those, how they vary from the previous versions of SSIS versions.


This is a look of the control flow in a brand new package of DENALI. Thought of creating a Flush and Load package, so lets drag the all new Data Flow Task into the designer. Check where you find it in the SSIS Tool box, all tasks nicely grouped up.


We are using a Source Assistant to configure the source. Once we drag the Source Assistant into the designer, a popup asking for the type of source rises, exactly shown in the below screen shot.


If you have a connection already saved, then make use of it else need to create a new one just like how we do in previous versions of SSIS. Once the connection (here in example it is SQL Server) is set, need to configure the table as in below screen shot.

I used a sort transformation to order the rows as per the employees salary, for which there is no much change in the setup. Now its the time to set the destination, so make use of Destination Assistant to configure it just like Source Assistant. The below screen shot is of 130% zoomed of the completed DFT. Notice the zoom feature available just beside the annotations.


Moving to Control Flow now, thought of flushing the data every time I want to load the data, so dear EST is called up and configured. Check the screen shots below.


The package is now ready to get execute, so lets fire it!!! Here is how it looks at the execution time.


The output of another package which creates timestamp based backup of specific list of databases is below.


There are lot of things to explore, and one need to find time from the multiple roles of multiple projects. Hope I find it regularly. The next post would be discussing the enhancements and benefits with other transformations. HAND. :)


Friday, June 17, 2011

First Look at DENALI!!!

The good place for testing every software is the client's place, where its implemented in diverse platforms under different projects for various business needs. Some may get what they need from the software and some may not. SQL Server is one among such Microsoft technologies. SQL Server DENALI, the latest of SQL Server would be the most successful RDBMS and Business Intelligence Suite and surely will challenge its own previous versions.


Enhancements in SSMS:


Lets connect to it and start digging.


The CTP 1 version of DENALI is 11.0.1103.9.


The GUI has lot of enhancements and interesting one is the zoom feature for both query and results area. 


You can notice that in the screen shot above. Next is the multiple query sub windows, just like Google chrome tabs.


DENALI is a ocean and cannot be discussed in a single post so this is just a flash of introduction on DENALI. The next post will deal with the enhancements to SSIS Project area.

Saturday, February 19, 2011

TempDB is Special!!!

TempDB, one of the system databases of SQL Server Database Engine is very special. Special, because it is re-created every time SQL Server is restarted. This is nothing but a place for temporary user objects and internal objects explicitly created by SQL Server itself.

When we create a new user database in SQL Server, the model database is used as a template for the creation. The same thing applies for TempDB too, it will inherit the database options from model database except the recovery model, because TempDB always uses Simple Recovery Model.

TempDB Objects:

a) User Objects: We can create Local and Global temporary tables that reside in TempDB. # and ## are the prefixes for local and global temporary tables respectively. Other objects that are stored in TempDB are table variables and table-valued functions.

b) Internal Objects: The internal objects in TempDB are not visible using the normal tools. The catalog views also do not store there metadata, because its stored only in memory. The 3 basic types of internal objects are work tables, work files, and sort units.

Work tables are created by SQL Server during these activities:

  • To hold intermediate results during a large query (Spooling)
  • Running DBCC CHECKDB or DBCC CHECKTABLE
  • Working with XML or varchar(MAX) variables
  • Processing SQL Service Broker objects
  • Working with static cursors

When SQL Server processes a query that uses a hash operator (either for joining and aggregating data) then Work files are used.

In addition to a query containing an ORDER BY clause, when a sort operation takes place, the Sort units are created. Certain types of joins might require SQL Server sort the data before performing the join. Sort units are created in TempDB to hold the data as it is being sorted. 

Conclusion:
Internal Objects is that area, which is not exposed to the regular querying side. But, its important to know whats happening inside IT.


Wednesday, January 5, 2011

Variable-Length vs. Fixed-Length

If there is any difficult step in designing a table, then one would say it is deciding whether to use a variable-length or a fixed-length data type.

People take it as a general rule, to use variable-length data types as the most appropriate when they expect fluctuations of the data for a column.

Using variable-length columns can sometimes improve the performance as it allows more rows to fit in a data page. In the last post, I have discussed the table size estimation with a sample customerinfo table, where I used the numbers 8096 and 8192, which are related to data page. A data page of SQL Server is of 8KB (8192 bytes), of which 8096 are available to store data. The rest is used for the internal purpose of keeping track of structural information of the page and object to which the page belongs.

One I/O operation brings back the entire page, that means fitting 160 rows on a page is efficient than 80 rows per page. To summarize, the more rows you can fit per page, the better the I/O and cache-hit efficiency is.

Example:

Fig: A, CustomerInfo_Fixed table with fixed-length columns

CustomerInfo_Fixed
ID
Smallint
Name
Char(50)
Address1
Char(50)
Address2
Char(50)
City
Char(50)
State
Char(2)
Postal Code
Char(10)
Phone
Char(20)
Fax
Char(20)
Email
Char(30)
Website
Char(100)

In the above fixed-length structured table (Fig: A), every row uses 384 bytes (Add up the bytes of data types of all columns) for data regardless of the number of characters actually inserted in the row. SQL Server also needs an additional 10 bytes of overhead for every row in this table. So, each row needs 394 bytes for storage.

Rows Per Page Calculation: Page Size/Size of each row8096/394 = 20 rows

Fig: B, CustomerInfo_Variable table with variable-length columns

CustomerInfo_Variable
ID
Smallint
Name
Varchar(50)
Address1
Varchar(50)
Address2
Varchar(50)
City
Varchar(50)
State
Char(2)
Postal Code
Varchar(10)
Phone
Varchar(20)
Fax
Varchar(20)
Email
Varchar(30)
Website
Varchar(100)

Now, the variable-length table (Fig: B), lets assume that for all the variable-length (varchar) columns the average entry is actually only about half the maximum. Instead of a row of length of 394 bytes, the average length is about 224 bytes. 
The calculation of 224 bytes is as below: 
1. Smallint + Char(2) = 4 bytes
2. Half of Maximum Varchar columns = 380/2 = 190 bytes
3. 2-byte overhead for each of 9 Varchar columns = 18 bytes
4. 2-bytes for any row that has one or more variable length columns= 2 bytes
5. Every row SQL Server overhead (as discussed above in fixed-length case) = 10 bytes
Finally, Total Bytes = 4+190+18+2+10 = 224 bytes

Rows Per Page Calculation: Page Size/Size of each row = 8096/224 = 36 rows


Conclusion: The difference in (rows per page) RPP of fixed-length (20) to RPP of variable-length (36), clearly illustrates which one is better to go with, CHAR? OR VARCHAR?. The table using variable-length columns will consume about half as many pages in storage, a single I/O retrieves almost twice as many rows.